
Some users are facing Runtime Broker’s high CPU usage issue, and they consider it as a virus while it is a legitimate Windows process.
In this article, I will educate you what is Runtime Broker and How to fix it.
What is Runtime Broker?
Runtime Broker is a system process in Windows 10 that manages app permissions between the Windows apps, like a universal Windows apps and the apps installed from the Windows store.
RuntimeBroker.exe is an executable file located in the System32 folder on Windows 10.
In short, as the name suggests, it can be described as a security broker or a trader between your security and applications.
Runtime Broker High CPU Usage in Windows 10:
Some users have experienced issues with it, where the process is consuming almost all or too much of the CPU which causes the system to go slow.
As per Microsoft, in normal circumstances, Runtime Broker shouldn’t use more than a few MB of memory, but in some cases, it uses even 1GB of RAM or more. If it is showing above 15% usage of memory, it means there is a serious issue with the Runtime Broker.
Such High CPU usage affects the processor’s performance and, in time, it can shorten its lifespan.
If Runtime Broker causes high CPU usage, try out the workarounds listed below to fix this issue.
Fix Runtime Broker’s High CPU and Memory Usage:
Fix 1: Disabling RuntimeBroker.exe to stop high CPU usage via Registry Editor:
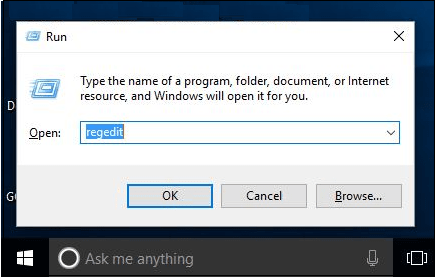
- Type in Regedit into the Windows 10 search box and press enter.
- Navigate to the Following trees from the sideboard pane, HKEY_LOCAL_MACHINE\SYSTEM\CurrentControlSet\Services\TimeBroker.
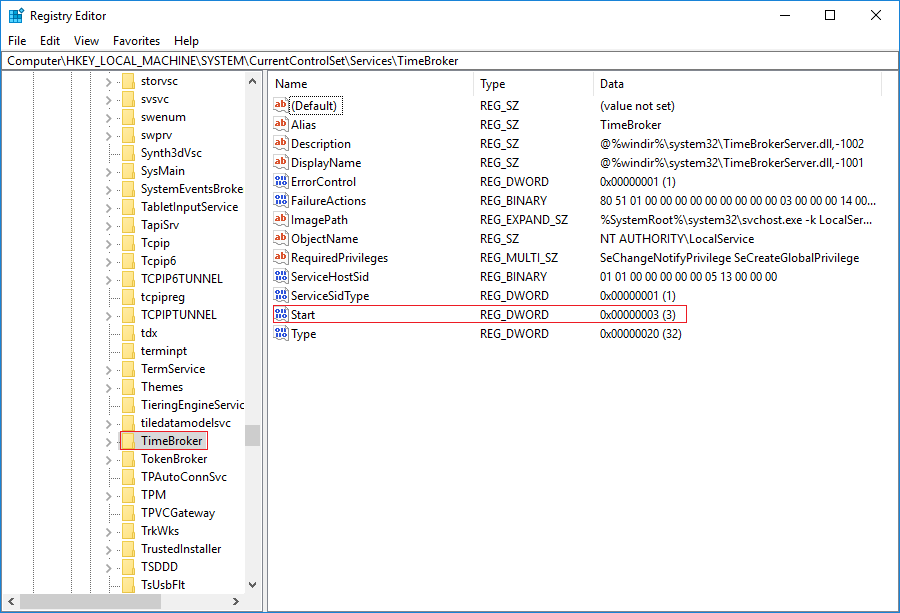
- On the right pane, Tap on Start and change the Value data from 3 to 4.
Now restart the system. Now you can check the existence of the Runtime Broker in the Task Manager. You will not find it there because it has been disabled. Don’t worry! It’s Turn Off and does not adversely effects the PC.
Fix 2: Stop the Runtime Broker Process in Task Manager:
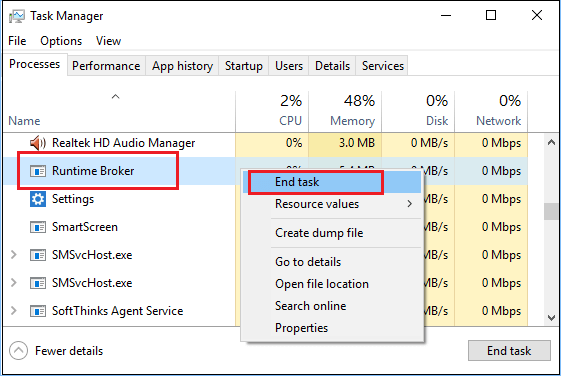
- Right-click on the Start button and then click on Task Manager.
Note: You can also use the Ctrl-Shift-Esc key combination to open the Task Manager.
- Now, click on the Process tab and locate Runtime Broker in the processes list.
- Right-click on Runtime Broker and then click on End Task.
- Restart your PC.
However, please note that killing Runtime Broker from the Task Manager is a temporary solution. Runtime Broker will once again launch itself when you restart your computer and you start using Windows Apps.
Fix 3: Turn off “Get tips, tricks, and suggestions as you use Windows” option:
- Click on the Settings button from the Start menu.
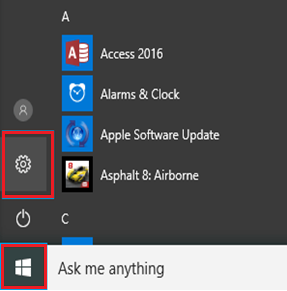
- On the Settings screen, click on System.

- Click on Notifications & actions on the left pane. Then scroll down to toggle OFF “Get tips, tricks, and suggestions as you use Windows” on the right pane.
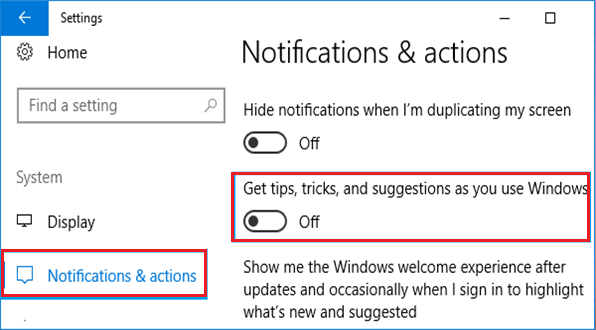
- Restart your computer.
Fix 4: Disable Background Apps:
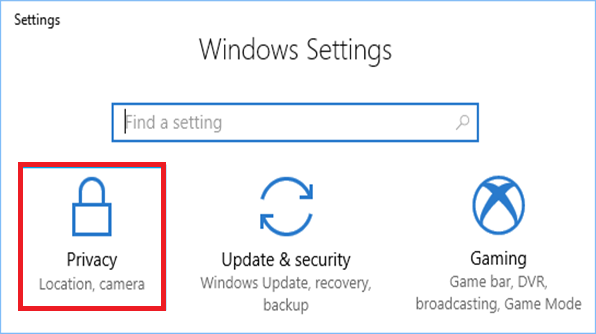
- Go to Settings as step 1 shown in Fix 3.
- On the Settings screen, click on Privacy.
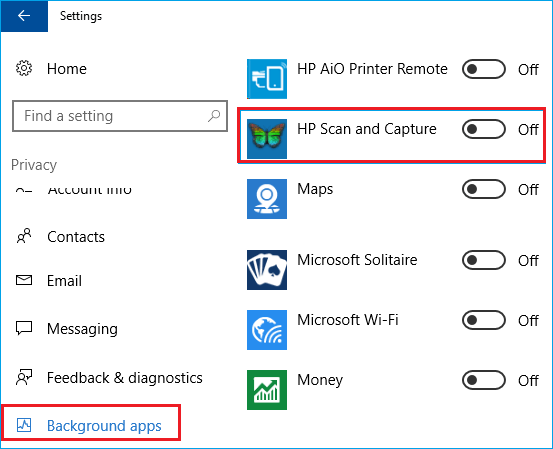
- Scroll down on the left pane to choose Background apps and toggle OFF the on-run apps.
That’s it. Use the above-mentioned solutions and celebrate your success because you have fixed the Runtime Broker consuming high usage.
Also Read: Easy Steps To Get In Safe Mode- Windows 10


Hamad Zia
well written post. It's so useful. The article has a complete data with nice info. good work. And keep it up and collect much more data. Thank you